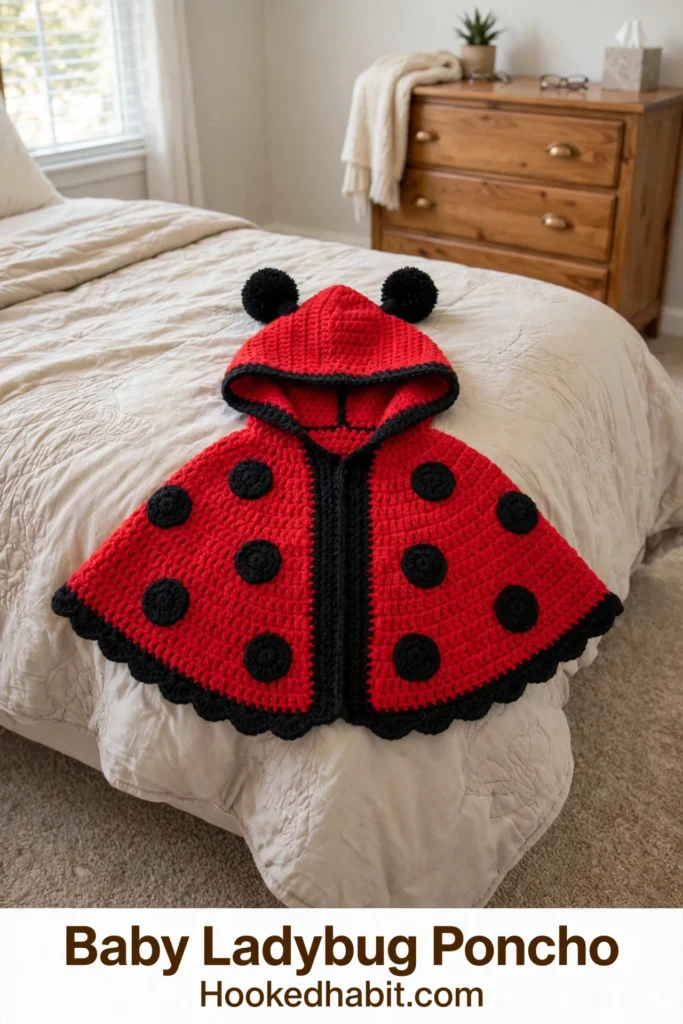
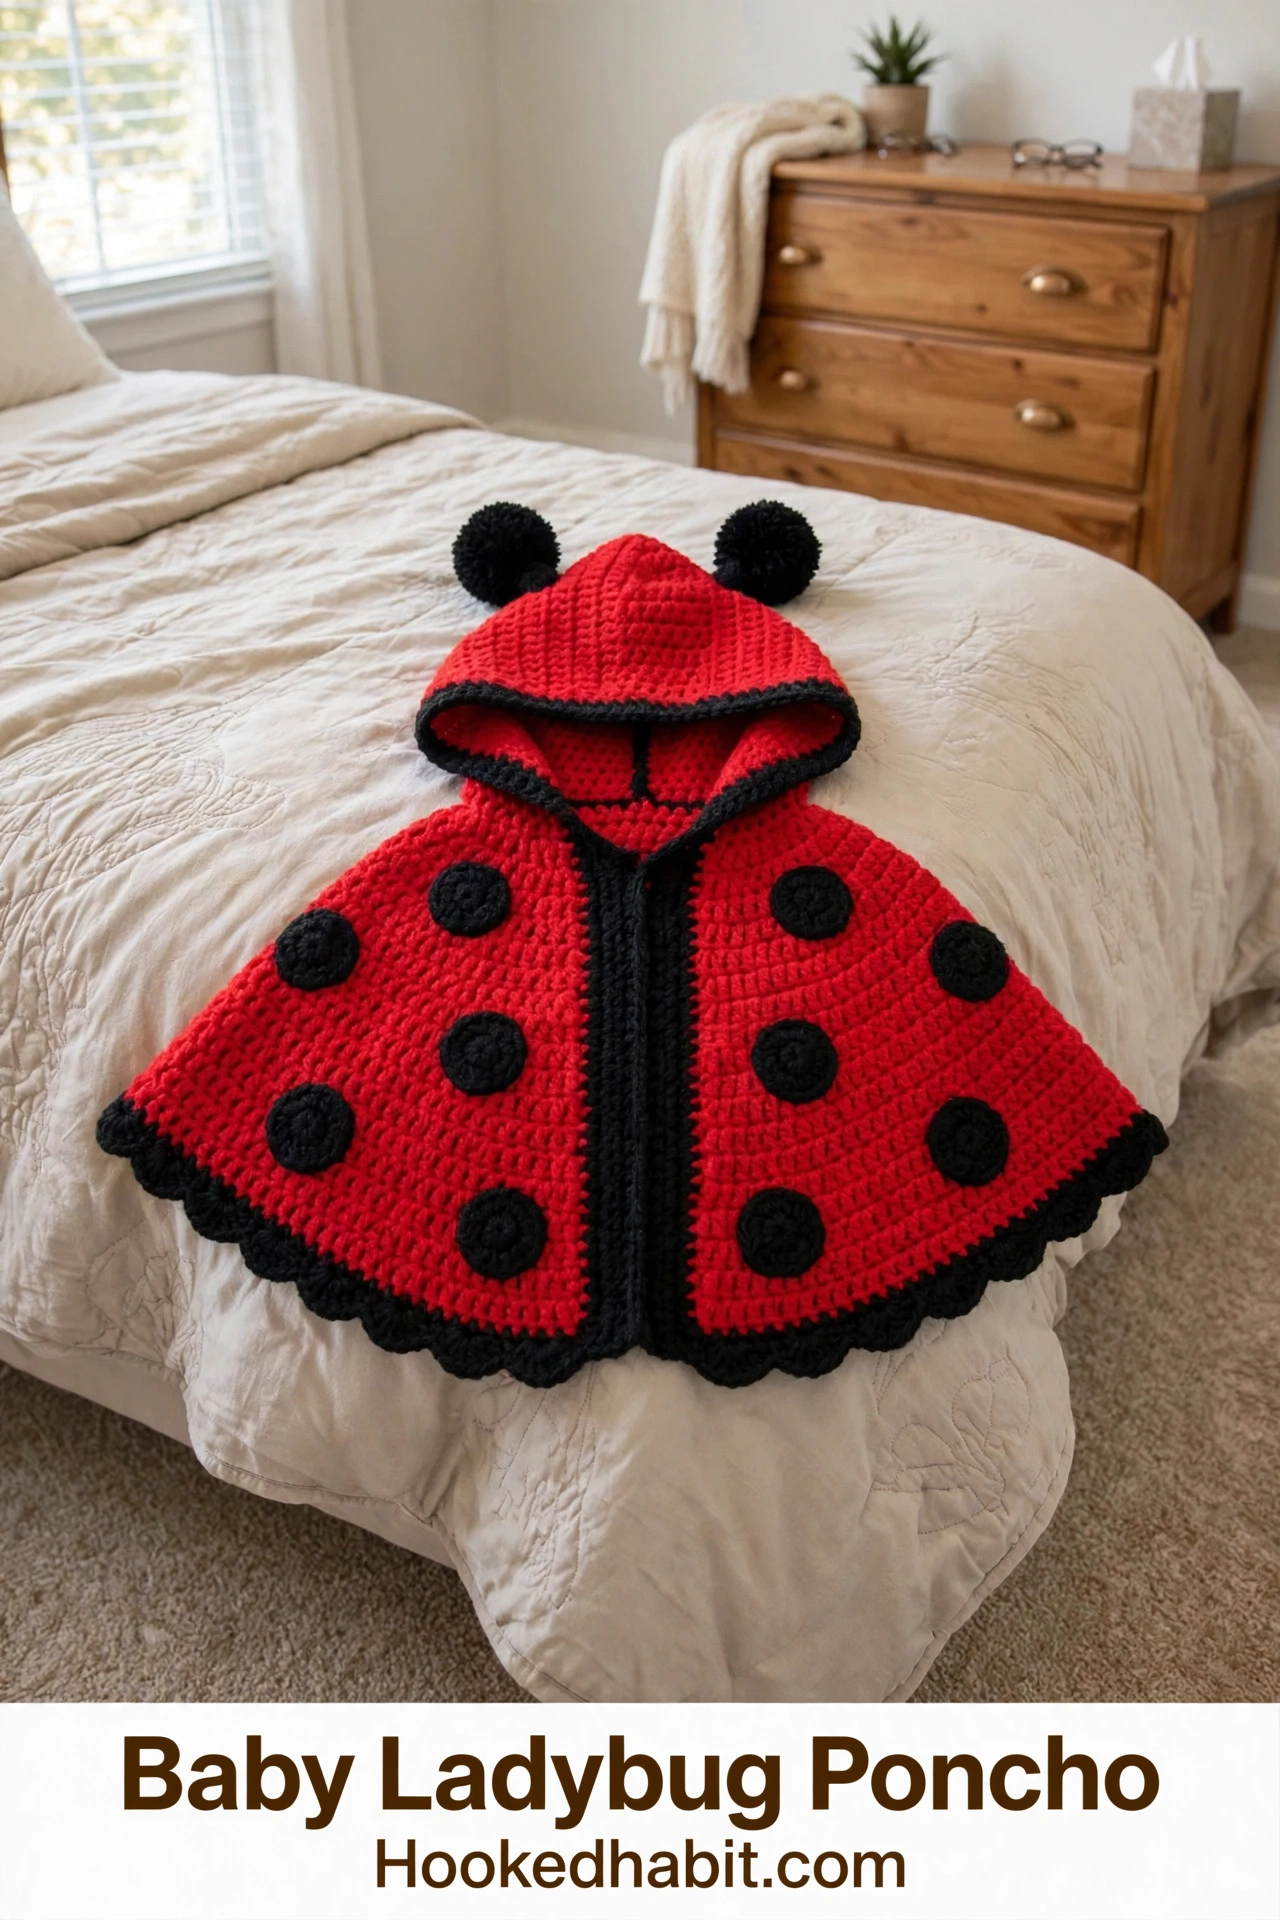
Oh, sweet friends, wait until you see this one. A tiny ladybug poncho for the littlest love in your life — bright red wings, little black spots, a cozy hood with the silliest pompom antennae. This is the kind of project that makes everyone at the baby shower lean in close and say, “You MADE that?” And the loveliest part? It works up in about 10 to 14 hours total, so a cozy weekend is all you need.
If you’ve been hunting for that perfect baby gift — the one that looks like it took weeks but is secretly so doable — pour yourself some tea and settle in. Two flat panels, a rounded hood, some sweet little circles for the spots, and a scalloped edge. That’s truly the whole thing, and I’m going to hold your hand through every step.
Why You Will Love This Crochet Baby Poncho Pattern
There’s something so heartwarming about making clothes for babies, isn’t there? This little ladybug poncho takes simple single crochet and dresses it up with the sweetest details — a bright red body like a ladybug’s wings, black polka dot appliques, a scalloped border, and those pompom antennae that just make you smile.
What I love most is how straightforward the construction is. No fussy shaping, no joining as you go. You make two identical flat panels, seam them at the shoulders, and attach a separately worked hood. It comes together like a puzzle, and watching those flat pieces turn into a real little garment is pure joy.
The poncho fits babies aged 6 to 12 months, and I’ve included tips for sizing up or down. It makes a wonderful baby shower gift, a holiday present, or the sweetest photo prop. Just be warned — once you share a photo of a baby wearing this, every parent you know will be placing an order!
Skill Level and Time Commitment
I’d call this an intermediate crochet pattern. The stitch work itself is simple — single crochet throughout the body and hood. But you’ll want to be comfortable with a few techniques: working flat panels with regular increases, seaming pieces together, picking up stitches around a neckline, and making small circular appliques.
If you’re a confident beginner ready to stretch your wings a little, this is a lovely next-step project. Take your time with the assembly and you’ll do beautifully.
Time estimate: Approximately 10 to 14 hours for an experienced intermediate crocheter. This breaks down across the two panels, ten applique circles, the hood, all the edging, and finishing work. Spread it across a few cozy evenings or tackle it in one determined weekend.
Materials You Will Need
Let’s gather everything before we begin — it makes the whole project feel calm and enjoyable. Here is what the pattern calls for:
Yarn:
– Worsted weight yarn (category 4)
– Color A (Red): approximately 350 yards / 320 meters
– Color B (Black): approximately 100 yards / 91 meters
Suggested yarn options:
– Lion Brand Pound of Love in Scarlet and Black
– Paintbox Yarns Simply DK held double
– Red Heart Soft in Really Red and Black
Choose a smooth, machine washable yarn for baby items. Avoid fuzzy or textured yarns since they make stitch definition harder to see and applique placement tricky.
Hook:
– US size J-10 / 6.0 mm crochet hook
Notions:
– Yarn needle for seaming and weaving ends
– 4 stitch markers
– Scissors
– Two black pompoms, approximately 1.5 inches / 4 cm in diameter
– Rust-proof pins for blocking
Gauge
14 single crochet stitches and 16 rows = 4 inches / 10 cm worked flat in single crochet with a size J-10 / 6.0 mm hook, after blocking.
Gauge matters here, friends. A poncho that’s too small won’t fit over baby’s head and shoulders, and one that’s too large will slip right off. Make a swatch at least 5 x 5 inches and adjust your hook size if needed. Go up a hook size if your swatch is too tight, down if it is too loose.
Finished Measurements
- Poncho body length from shoulder to hem: approximately 10 inches / 25.5 cm
- Width across each panel at hem: approximately 14 inches / 35.5 cm
- Total width when worn, shoulder to shoulder across back: approximately 11 inches / 28 cm
- Hood height: approximately 7 inches / 18 cm
- Hood circumference at opening: approximately 14 inches / 35.5 cm
Abbreviations and Stitch Definitions
Let me walk you through every abbreviation used in this pattern so nothing catches you off guard:
- ch = chain: Wrap yarn over hook, pull through loop on hook
- sl st = slip stitch: Insert hook, yarn over, pull through stitch and loop on hook in one motion
- sc = single crochet: Insert hook, yarn over, pull up a loop (2 loops on hook), yarn over, pull through both loops
- sc2tog = single crochet two together: A decrease that combines two stitches into one
- inc = increase: Work 2 single crochet stitches in the same stitch
- st(s) = stitch(es)
- RS = right side
- WS = wrong side
- sp = space
- rep = repeat
- pm = place marker
- rnd = round
- rem = remaining
- tch = turning chain
Special Stitches
Scallop Stitch (used for the hem and hood border)
This creates those pretty wavy edges you see in the photos:
- Slip stitch into the indicated stitch
- Chain 3
- Work 4 double crochet stitches into the same stitch as the slip stitch
- Skip the next 2 stitches
- Slip stitch into the next (third) stitch
- Repeat steps 2 through 5 across the edge
Each scallop uses 3 stitches total. Keep this in mind for stitch count planning.
Polka Dot Applique Circle
These black spots bring the whole ladybug look together. You will make 10 total.
With Color B (Black), make a magic ring.
Rnd 1: Ch 1, work 6 sc into ring, sl st to first sc to join. (6 sc)
Rnd 2: Ch 1, work 2 sc in each sc around, sl st to first sc to join. (12 sc)
Rnd 3: Ch 1, (sc in next sc, 2 sc in next sc) 6 times, sl st to first sc to join. (18 sc)
Rnd 4: Ch 1, (sc in next 2 sc, 2 sc in next sc) 6 times, sl st to first sc to join. (24 sc)
Fasten off, leaving a long tail for sewing. Each finished circle measures approximately 1.75 to 2 inches / 4.5 to 5 cm in diameter.
Pattern Notes Before You Begin
A few things to keep in mind as you work:
- The poncho is made of two identical flat panels worked from the neckline down
- Each panel starts with a chain of 39, giving you 38 working stitches
- Increases happen at the edges of every row, plus additional paired increases on alternating rows
- The center front stays open for easy dressing
- Color A (Red) is used for all body and hood fabric
- Color B (Black) is used for scallop edging, applique circles, and hood trim
- The turning chain of 1 does NOT count as a stitch throughout this pattern
- Weave in ends as you go to minimize finishing time
Step by Step Crochet Instructions
Poncho Panels (Make 2)
Both panels are identical. Work them the same way.
With Color A (Red), ch 39.
Row 1 (RS): Sc in 2nd ch from hook and in each ch across. Turn. (38 sc)
Row 2: Ch 1, 2 sc in first st, sc in each st across to last st, 2 sc in last st. Turn. (40 sc)
Row 3: Ch 1, 2 sc in first st, sc in next 9 sts, 2 sc in next st, sc in next 18 sts, 2 sc in next st, sc in next 9 sts, 2 sc in last st. Turn. (44 sc)
Row 4: Ch 1, 2 sc in first st, sc in each st across to last st, 2 sc in last st. Turn. (46 sc)
Row 5: Ch 1, 2 sc in first st, sc in next 11 sts, 2 sc in next st, sc in next 20 sts, 2 sc in next st, sc in next 11 sts, 2 sc in last st. Turn. (50 sc)
Row 6: Ch 1, 2 sc in first st, sc in each st across to last st, 2 sc in last st. Turn. (52 sc)
Row 7: Ch 1, 2 sc in first st, sc in next 12 sts, 2 sc in next st, sc in next 24 sts, 2 sc in next st, sc in next 12 sts, 2 sc in last st. Turn. (56 sc)
Row 8: Ch 1, 2 sc in first st, sc in each st across to last st, 2 sc in last st. Turn. (58 sc)
Row 9: Ch 1, 2 sc in first st, sc in next 14 sts, 2 sc in next st, sc in next 26 sts, 2 sc in next st, sc in next 14 sts, 2 sc in last st. Turn. (62 sc)
Row 10: Ch 1, 2 sc in first st, sc in each st across to last st, 2 sc in last st. Turn. (64 sc)
Row 11: Ch 1, 2 sc in first st, sc in next 15 sts, 2 sc in next st, sc in next 30 sts, 2 sc in next st, sc in next 15 sts, 2 sc in last st. Turn. (68 sc)
Row 12: Ch 1, 2 sc in first st, sc in each st across to last st, 2 sc in last st. Turn. (70 sc)
Row 13: Ch 1, 2 sc in first st, sc in next 17 sts, 2 sc in next st, sc in next 32 sts, 2 sc in next st, sc in next 17 sts, 2 sc in last st. Turn. (74 sc)
Row 14: Ch 1, 2 sc in first st, sc in each st across to last st, 2 sc in last st. Turn. (76 sc)
Row 15: Ch 1, 2 sc in first st, sc in next 18 sts, 2 sc in next st, sc in next 36 sts, 2 sc in next st, sc in next 18 sts, 2 sc in last st. Turn. (80 sc)
Row 16: Ch 1, 2 sc in first st, sc in each st across to last st, 2 sc in last st. Turn. (82 sc)
Row 17: Ch 1, 2 sc in first st, sc in next 20 sts, 2 sc in next st, sc in next 38 sts, 2 sc in next st, sc in next 20 sts, 2 sc in last st. Turn. (86 sc)
Row 18: Ch 1, 2 sc in first st, sc in each st across to last st, 2 sc in last st. Turn. (88 sc)
Row 19: Ch 1, 2 sc in first st, sc in next 21 sts, 2 sc in next st, sc in next 42 sts, 2 sc in next st, sc in next 21 sts, 2 sc in last st. Turn. (92 sc)
Row 20: Ch 1, 2 sc in first st, sc in each st across to last st, 2 sc in last st. Turn. (94 sc)
Row 21: Ch 1, 2 sc in first st, sc in next 23 sts, 2 sc in next st, sc in next 44 sts, 2 sc in next st, sc in next 23 sts, 2 sc in last st. Turn. (98 sc)
Row 22: Ch 1, 2 sc in first st, sc in each st across to last st, 2 sc in last st. Turn. (100 sc)
Row 23: Ch 1, 2 sc in first st, sc in next 24 sts, 2 sc in next st, sc in next 48 sts, 2 sc in next st, sc in next 24 sts, 2 sc in last st. Turn. (104 sc)
Row 24: Ch 1, 2 sc in first st, sc in each st across to last st, 2 sc in last st. Turn. (106 sc)
Row 25: Ch 1, 2 sc in first st, sc in next 26 sts, 2 sc in next st, sc in next 50 sts, 2 sc in next st, sc in next 26 sts, 2 sc in last st. Turn. (110 sc)
Row 26: Ch 1, 2 sc in first st, sc in each st across to last st, 2 sc in last st. Turn. (112 sc)
Row 27: Ch 1, 2 sc in first st, sc in next 27 sts, 2 sc in next st, sc in next 54 sts, 2 sc in next st, sc in next 27 sts, 2 sc in last st. Turn. (116 sc)
Row 28: Ch 1, sc in each st across. Turn. (116 sc)
Fasten off Color A, leaving a long tail for seaming.
Checkpoint: Each panel should measure approximately 7 inches / 18 cm tall and approximately 14 inches / 35.5 cm wide at the hem. The piece will have a gently flared trapezoid shape.
Joining the Panels
Hold both completed panels with right sides facing up. The foundation chain edge is the neckline (top).
Measure 3.5 inches / 9 cm in from each side edge at the top of each panel. Place markers at these points. These mark the ends of the shoulder seams.
Using a yarn needle and Color A, whipstitch the left shoulder seam from the marker to the outer edge of the neckline, approximately 3.5 inches / 9 cm. Repeat for the right shoulder seam.
Leave the center neckline open (approximately 11 inches / 28 cm) for the hood attachment. Leave the side edges below the shoulder seams open as armholes, approximately 3.5 inches / 9 cm wide on each side.
Hood
The hood is worked in continuous rounds.
With Color A (Red), ch 49. Sl st to first ch to form a ring, being careful not to twist.
Rnd 1: Ch 1, sc in each ch around. (48 sc)
Place a stitch marker in the first stitch of each round and move it up as you work.
Rnd 2: Sc in each sc around. (48 sc)
Rnd 3: Sc in next 22 sc, 2 sc in next sc, sc in next 2 sc, 2 sc in next sc, sc in rem 22 sc. (50 sc)
Rnd 4: Sc in each sc around. (50 sc)
Rnd 5: Sc in next 23 sc, 2 sc in next sc, sc in next 2 sc, 2 sc in next sc, sc in rem 23 sc. (52 sc)
Rnd 6: Sc in each sc around. (52 sc)
Rnd 7: Sc in next 24 sc, 2 sc in next sc, sc in next 2 sc, 2 sc in next sc, sc in rem 24 sc. (54 sc)
Rnd 8: Sc in each sc around. (54 sc)
Rnd 9: Sc in next 25 sc, 2 sc in next sc, sc in next 2 sc, 2 sc in next sc, sc in rem 25 sc. (56 sc)
Rnd 10: Sc in each sc around. (56 sc)
Rnd 11: Sc in next 26 sc, 2 sc in next sc, sc in next 2 sc, 2 sc in next sc, sc in rem 26 sc. (58 sc)
Rnd 12: Sc in each sc around. (58 sc)
Rnd 13: Sc in next 27 sc, 2 sc in next sc, sc in next 2 sc, 2 sc in next sc, sc in rem 27 sc. (60 sc)
Rnd 14: Sc in each sc around. (60 sc)
Rnd 15: Sc in next 28 sc, 2 sc in next sc, sc in next 2 sc, 2 sc in next sc, sc in rem 28 sc. (62 sc)
Rnd 16: Sc in each sc around. (62 sc)
Rnd 17: Sc in next 29 sc, 2 sc in next sc, sc in next 2 sc, 2 sc in next sc, sc in rem 29 sc. (64 sc)
Rnd 18: Sc in each sc around. (64 sc)
Rnd 19: Sc in next 30 sc, 2 sc in next sc, sc in next 2 sc, 2 sc in next sc, sc in rem 30 sc. (66 sc)
Rnd 20: Sc in each sc around. (66 sc)
Rnd 21: Sc in next 31 sc, 2 sc in next sc, sc in next 2 sc, 2 sc in next sc, sc in rem 31 sc. (68 sc)
Rnd 22: Sc in each sc around. (68 sc)
Rnd 23: Sc in next 32 sc, 2 sc in next sc, sc in next 2 sc, 2 sc in next sc, sc in rem 32 sc. (70 sc)
Rnd 24: Sc in each sc around. (70 sc)
Sl st into next st. Fasten off Color A, leaving a long tail for sewing.
Checkpoint: The hood should measure approximately 7 inches / 18 cm in height and approximately 14 inches / 35.5 cm in circumference at the opening.
Hood Border
With Color B (Black) and RS facing, join yarn at the front lower right corner of the hood opening.
Row 1: Ch 1, sc evenly around the hood opening edge, working approximately 1 sc per row end. Work approximately 48 sc around the opening. Sl st to first sc to join. (48 sc)
Row 2: Ch 1, work scallop stitch as follows: (sl st in next sc, ch 3, 4 dc in same st, skip 2 sc) repeat around, sl st to base of first scallop. Fasten off Color B.
Antennae Attachment
Make 2 pompoms using Color B, each approximately 1.5 inches / 4 cm in diameter.
Sew one pompom firmly to the left side of the hood crown and one to the right side, spaced approximately 2 inches / 5 cm apart. Position them at the very top of the dome. Tie off all ends securely on the inside.
Hood Attachment
Pin the hood to the neckline opening, aligning the front edges of the hood with the front edges of the center neckline opening. The hood opening circumference should fit the neckline opening. Ease any difference evenly around.
Whipstitch the hood to the neckline from the inside using a yarn needle and Color A. Fasten off and weave in ends.
Applique Placement
Block each circle flat before sewing (this helps them lay nicely).
Pin the circles to both panels with RS facing. A suggested arrangement per panel:
- Upper row: 2 circles placed symmetrically on either side of center, approximately 2 inches from the shoulder and 2 inches from the center edge
- Middle row: 2 circles spaced evenly between the upper row circles, approximately 3 to 4 inches below the upper row
- Lower row: 1 circle centered at the lower middle of the panel, approximately 2 inches above the hem
Sew each circle using whipstitch. Fasten off and weave in ends to the inside.
Edging
Hem Edging:
Join Color B at the lower right front corner of one panel.
Adjustment row: Ch 1, sc across the entire hem of both panels. Across the first panel (116 sts), sc2tog twice evenly spaced, giving 114 sc. Across the second panel, sc2tog twice evenly spaced, giving 114 sc. Total: 228 sc.
Scallop row: Work scallop stitch across all 228 sts. Total scallops: 76. Fasten off Color B.
Front Opening Edging:
Join Color B at the top right front edge at the neckline. Work sc evenly down the right front edge (approximately 28 sc), work 3 sc in the corner stitch to turn neatly, and continue up the left front edge (approximately 28 sc). Fasten off.
Hood Center Trim:
Join Color B at the top of the hood where it meets the front right edge. Work a single row of sl st or sc down the center front of the hood, approximately 7 inches. Fasten off.
Finishing and Blocking
Weave in all remaining ends to the wrong side, working tails through several stitches in different directions.
Wet blocking: Submerge in cool water, gently press out excess water without wringing, lay flat on a towel or blocking mat. Shape panels flat and symmetrical, pin the hem to form a smooth curve. Allow to dry completely, typically 24 hours.
Steam blocking (for acrylic): Hold a steam iron approximately 1 inch above the surface and apply steam without touching the iron to the yarn. Do not press directly as acrylic can melt.
Care Instructions
Machine wash cold on gentle cycle. Lay flat to dry. Do not wring. Do not tumble dry on high heat. Do not dry clean.
Size Customization Tips
For 12 to 18 months: Begin with ch 43 (42 working sts), work 32 total rows. Adjust hood chain to 53 (52 working sts), work 28 rounds.
For 18 to 24 months: Begin with ch 47 (46 working sts), work 36 total rows. Adjust hood chain to 57 (56 working sts), work 32 rounds. You will need approximately 420 yards Color A and 120 yards Color B.
For 0 to 6 months: Begin with ch 35 (34 working sts), work 24 rows. Adjust hood chain to 45 (44 working sts), work 20 rounds. You will need approximately 280 yards Color A and 80 yards Color B.
General rule: Every 4 additional stitches in the starting chain adds approximately 1 inch to the neckline width. Every 4 additional rows adds approximately 1 inch to the body length.
Final Thoughts on This Baby Ladybug Poncho Crochet Pattern
I just know you’re going to love every minute of making this little ladybug. There’s nothing quite like watching simple stitches turn into something so sweet, and the smile on a mama’s face when she sees her baby in it? That’s the real reward, friends. Happy crocheting!
You Might Also Like
- Baby Bumblebee Hooded Poncho Free Crochet Pattern
- Strawberry Sweet Baby Bonnet Free Crochet Pattern
- Cozy Red Hooded Baby Cardigan Free Crochet Pattern
- Little Ladybug Baby Booties Free Crochet Pattern