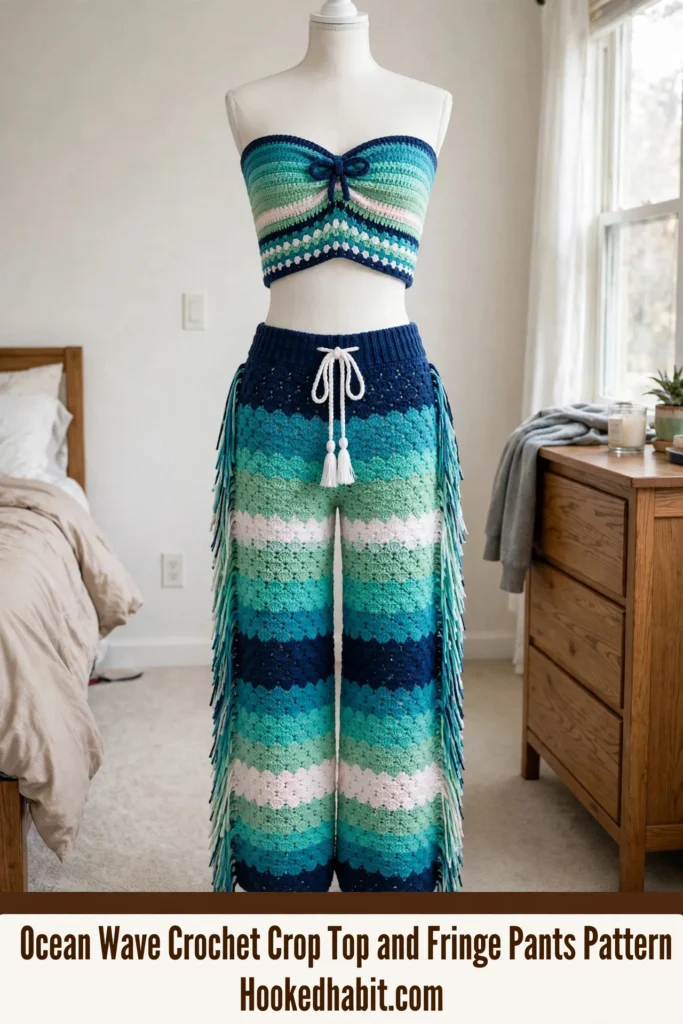
Oh, darling, I have a little confession to make. I named this design long before I ever finished it. “Ocean Wave” was scribbled in the corner of my notebook for months while I worked out the shell stitch sequence and debated, at length, just how long the fringe should be. It all began as a sketch during a beach vacation three summers ago. I simply could not stop thinking about the way the water changed color at different depths, from the deep navy near the horizon to the palest turquoise where it melted into the sand.
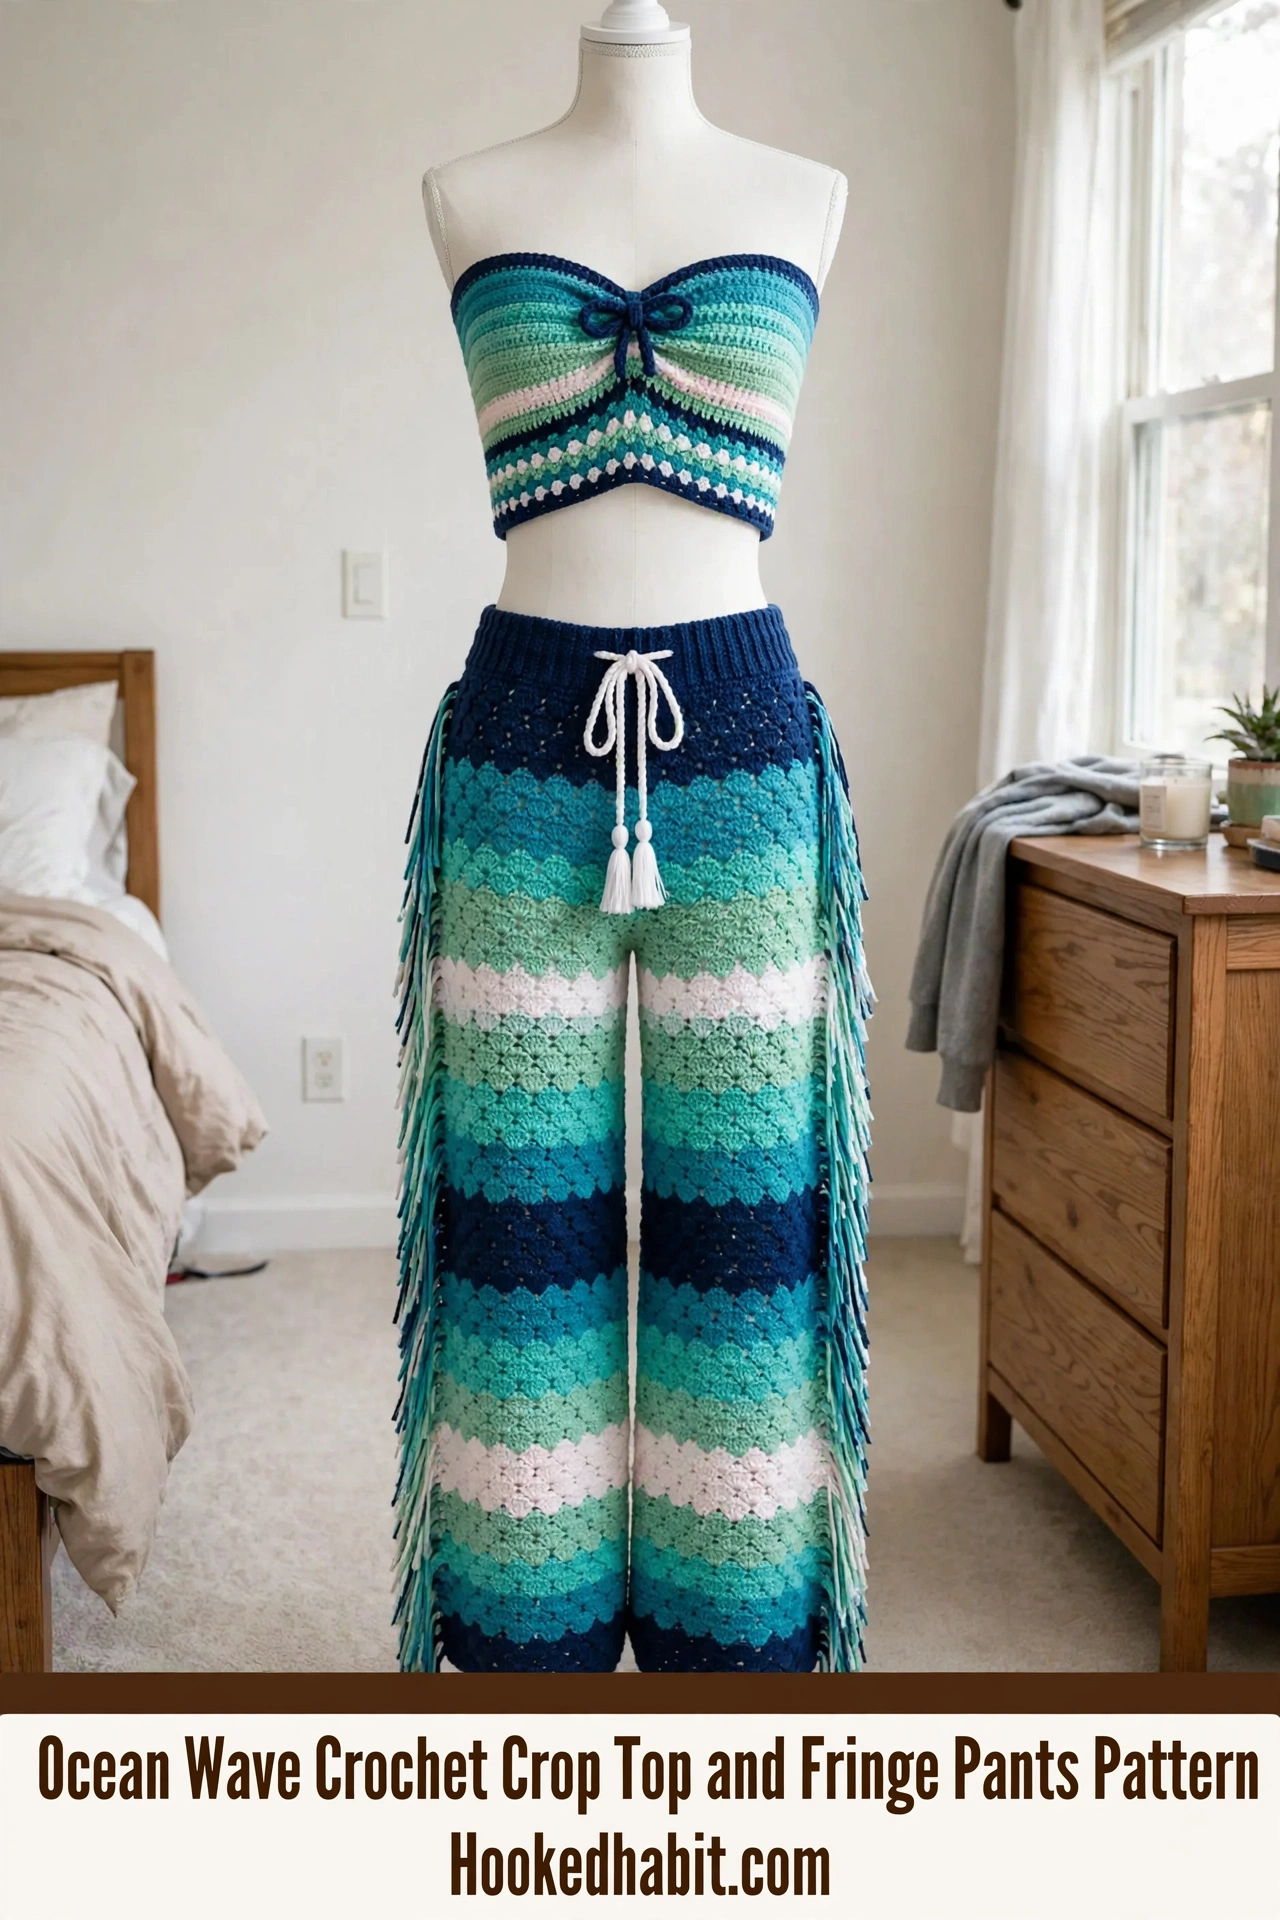
The very first version was only the pants. I made them for my sister’s birthday, and the moment she tried them on she asked, quite insistently, for a matching top. So I went back to that beloved notebook, worked out how to scale the wave stitch down, and designed the little bandeau with its gathered bow detail. She wore the whole set to a music festival that summer, and I have been receiving requests for the pattern ever since. This, at long last, is the complete write-up. Both pieces use the same shell wave stitch and the same color sequence, so once you have mastered the pattern repeat on the top, the pants will feel wonderfully familiar. The fringe does take time, but oh, how it transforms the entire look. I am genuinely, deeply proud of this one.
Pattern Overview
This Ocean Wave Crochet Crop Top and Fringe Pants Pattern creates a coordinated two-piece set with a bohemian, beachy vibe. The top is a strapless bandeau worked flat and seamed, featuring a ribbed lower band and a gathered center-front bow. The pants are wide-leg with a ribbed drawstring waistband and long fringe running down both outer side seams. Both pieces showcase a shell wave stitch pattern worked in horizontal stripes. The gradient color sequence moves from deep navy through teal, aqua, mint, and white, creating that ocean-depth effect I fell in love with years ago.
Skill Level: Intermediate. You’ll need comfort with working in rows and rounds, following a multi-color stripe sequence, shell stitch construction, seaming, ribbing, and applying fringe.
Time Estimate:
- Top: 8 to 12 hours
- Pants: 20 to 30 hours
- Total: 28 to 42 hours depending on your experience level
Finished Measurements
Top:
- Bust circumference (laid flat, unstretched): 28 in / 71 cm (stretches to fit 30 to 36 in / 76 to 91 cm)
- Height (center front, not including bow): 6 in / 15 cm
Pants:
- Waist circumference (relaxed): 28 in / 71 cm (stretches to fit 26 to 34 in / 66 to 86 cm)
- Hip circumference: 42 in / 107 cm
- Inseam length: 28 in / 71 cm
- Total pants length (waistband top to hem): 38 in / 97 cm
- Leg width at hem (each leg): 22 in / 56 cm
Materials You’ll Need
Yarn: Worsted weight yarn (Category 4)
- Top: approximately 800 yards / 730 m total
- Pants: approximately 2,400 yards / 2,195 m total
Hooks:
- US size I-9 / 5.5 mm for main fabric
- US size H-8 / 5.0 mm for ribbing sections
Notions:
- Tapestry needle for weaving ends
- Stitch markers (at least 6)
- Scissors
- 1 yd / 1 m white cord or braided rope for drawstring, approximately 0.25 in / 6 mm diameter
- 2 white tassel charms or yarn tassels for drawstring ends
- Blocking mats and pins
- Rust-proof T-pins
Yarn Color Breakdown
Color A (Deep Navy):
- Top: 80 yds / 73 m
- Pants: 400 yds / 366 m
Color B (True Teal):
- Top: 70 yds / 64 m
- Pants: 350 yds / 320 m
Color C (Medium Aqua):
- Top: 70 yds / 64 m
- Pants: 350 yds / 320 m
Color D (Light Aqua/Turquoise):
- Top: 70 yds / 64 m
- Pants: 350 yds / 320 m
Color E (Mint/Pale Green):
- Top: 70 yds / 64 m
- Pants: 350 yds / 320 m
Color F (Pale Blush/Light Pink):
- Top: 60 yds / 55 m
- Pants: 200 yds / 183 m
Color G (White):
- Top: 80 yds / 73 m
- Pants: 400 yds / 366 m
Fringe: Approximately 200 additional yards / 183 m total across all colors combined.
Yarn Suggestions
Choose a yarn with good stitch definition so the shell wave pattern reads clearly. Avoid fuzzy or textured yarns.
Option 1: Lion Brand Pound of Love (worsted weight, 100% acrylic). Excellent stitch definition and machine washable.
Option 2: Paintbox Yarns Simply DK used doubled. Wide color range makes matching the gradient palette easy.
Option 3: Cascade 220 Superwash (worsted weight, 100% superwash wool). Excellent drape and blocks beautifully.
Gauge
This is a garment that needs to fit, so please swatch.
Main fabric (shell wave stitch, larger hook): 14 stitches and 8 rows = 4 in / 10 cm
Ribbing (smaller hook, back loops only): 16 stitches and 10 rows = 4 in / 10 cm
Swatch at least a 6 in / 15 cm square in the shell wave stitch before beginning. Adjust hook size as needed to match gauge.
Abbreviations and Stitch Definitions
Before we dive into the step by step crochet tutorial, let’s cover all the terms you’ll encounter.
- blo – back loop only (inserting your hook under just the back loop of a stitch instead of both loops)
- ch – chain (the foundation stitch that creates a series of linked loops)
- ch-sp – chain space (the gap created by a chain in the previous row)
- dc – double crochet (yarn over, insert hook, pull up loop, yarn over and pull through 2 loops twice)
- hdc – half double crochet (yarn over, insert hook, pull up loop, yarn over and pull through all 3 loops)
- rem – remaining
- rep – repeat
- rnd(s) – round(s)
- RS – right side
- sc – single crochet (insert hook, pull up loop, yarn over and pull through both loops)
- sk – skip
- sl st – slip stitch (insert hook, pull loop through stitch and loop on hook)
- sp(s) – space(s)
- st(s) – stitch(es)
- t-ch – turning chain
- WS – wrong side
- yo – yarn over
Special Stitches
Shell Stitch
Work 5 double crochet (dc) all into the same stitch or chain space. This creates one shell unit. The shells are what give this pattern its wave-like appearance.
Wave Shell Row (Right-Side Row)
Skip 2 stitches, work 5 dc into next stitch (shell made), skip 2 stitches, single crochet (sc) into next stitch. Repeat across. The pattern repeat is 6 stitches.
Wave Shell Row (Wrong-Side Row)
Chain 3, turn. Work 2 dc into first sc (half shell at edge), sc into center (3rd) dc of next shell, work 5 dc into next sc, sc into center dc of next shell. Repeat across, ending 3 dc into final sc (half shell at edge).
Ribbing Stitch
Worked in back loops only. Row 1: Ch any number, sc in 2nd ch from hook and in each ch across. Turn. Row 2 onward: Ch 1, sc in blo of each st across. Turn. Repeat Row 2 for ribbing pattern.
Tassel (For Drawstring Ends)
Cut 20 strands of Color G each 8 in / 20 cm long. Fold in half. Fold one additional 12 in / 30 cm strand of Color G and loop it around the fold point. Wrap the long strand tightly around all strands approximately 0.5 in / 1.3 cm below the fold. Tie securely. Trim ends even. Attach to drawstring end by threading through loop and pulling snug.
Fringe Application
Cut strands of yarn each 20 in / 51 cm long. Fold one strand in half. Insert hook from front to back through the edge stitch. Pull folded loop through. Pull cut ends through the loop. Tug firmly to seat the knot. Fringe is applied with 2 strands per stitch along both outer side seams of the pants.
Stripe Color Sequence
Both pieces follow the same sequence. Here’s your reference:
- Stripe 1: 2 rows/rounds Color A (navy)
- Stripe 2: 2 rows/rounds Color B (teal)
- Stripe 3: 2 rows/rounds Color C (aqua)
- Stripe 4: 2 rows/rounds Color D (light aqua)
- Stripe 5: 2 rows/rounds Color E (mint)
- Stripe 6: 2 rows/rounds Color F (blush)
- Stripe 7: 4 rows/rounds Color G (white)
- Stripe 8: 2 rows/rounds Color E (mint)
- Stripe 9: 2 rows/rounds Color D (light aqua)
- Stripe 10: 2 rows/rounds Color C (aqua)
- Stripe 11: 2 rows/rounds Color B (teal)
- Stripe 12: 4 rows/rounds Color A (navy)
For the pants, this sequence repeats from Stripe 1 through Stripe 12 twice, then continues with Stripes 1 through 7 for the lower leg sections.
How to Crochet the Crop Top
Lower Ribbing Band
With Color A and smaller hook, ch 10. Row 1 (RS): Sc in 2nd ch from hook and in each ch across. Turn. (9 sc) Row 2: Ch 1, sc in blo of each st across. Turn. (9 sc) Repeat Row 2 until ribbing measures 56 in / 142 cm from beginning. This will wrap around the full circumference of both panels once seamed. Fasten off. Set aside.
Main Body Panels (Make 2)
The front and back panels are identical. With Color A and larger hook, ch 86. Foundation Row (WS): Sc in 2nd ch from hook and in each ch across. Turn. (85 sc)
Now begin the wave shell pattern. Colors change every 2 rows following the stripe sequence.
Row 1 (RS, Color A): Ch 3 (counts as first dc of half shell), 2 dc in first sc (half shell complete at edge), skip 2 sc, sc in next sc, skip 2 sc, work 5 dc in next sc (full shell), skip 2 sc, sc in next sc. Continue: (skip 2, shell in next sc, skip 2, sc in next sc) 12 times across, ending skip 2, 3 dc in last sc (half shell). Turn. (Half shell + 13 full shells + half shell)
Row 2 (WS, Color A): Ch 1, sc in first dc, ch 2, sc in center dc of next full shell, ch 2. Continue: (sc in center dc of next shell, ch 2) across, ending sc in top of t-ch. Turn. (29 sc, 28 ch-2 sps)
Row 3 (RS, Color B): Ch 3, 2 dc in first sc (half shell), sc in first ch-2 sp, shell (5 dc) in next sc, sc in next ch-2 sp. Continue: (shell in next sc, sc in next ch-2 sp) 12 times across, ending 3 dc in last sc. Turn.
Row 4 (WS, Color B): Repeat Row 2. (29 sc, 28 ch-2 sps)
Continue in established wave shell pattern, changing colors every 2 rows following the stripe sequence (A, B, C, D, E, F, G, E, D, C, B, A). Work through all 12 stripe sets (24 rows total including foundation row).
Checkpoint: After completing all wave rows, each panel should measure approximately 14 in / 36 cm wide and 6 in / 15 cm tall.
Final Row (WS, Color A): Ch 1, sc evenly across all sts, working 1 sc per dc and 1 sc per chain space. (85 sc) Fasten off.
Upper Ribbing Trim
With Color A and smaller hook, attach yarn at top right corner of one panel. Row 1 (RS): Ch 1, sc evenly across top edge of panel. You should have approximately 85 sc. Turn. Row 2: Ch 1, sc in blo of each st across. Turn. Rows 3 through 6: Repeat Row 2. Fasten off after Row 6. Repeat on second panel.
Bow and Gather Detail (Front Panel Only)
Cut a length of Color A approximately 24 in / 61 cm long. Thread onto tapestry needle. At the center top of the front panel, weave the yarn length through the top ribbing rows from right to left, gathering the center 3 in / 8 cm of fabric. Pull snugly but not so tight as to pucker. Tie into a bow at center front. Secure bow ends with a knot on the wrong side. Trim ends to 0.5 in / 1.3 cm.
Assembly
Hold front and back panels with right sides together. Using Color A and tapestry needle, whipstitch the side edges together from bottom to top ribbing on each side. (2 side seams) Turn right side out. Attach the lower ribbing band: With Color A and smaller hook, slip stitch the long edge of the ribbing band to the lower foundation chain edge of the joined panels, working all around the circumference. Seam the short ends of the ribbing band together at one side seam. Weave in all ends.
How to Crochet the Fringe Pants
Waistband
With Color A and smaller hook, ch 20. Row 1 (RS): Sc in 2nd ch from hook and in each ch across. Turn. (19 sc) Row 2: Ch 1, sc in blo of each st across. Turn. (19 sc) Repeat Row 2 until ribbing strip measures 28 in / 71 cm from start. Fasten off, leaving a 12 in / 30 cm tail. Seam the short ends together using the tail and tapestry needle to create a tube. Weave in end.
Drawstring Channel
Working along the top edge of the waistband tube, with Color G and larger hook, attach yarn at seam. Rnd 1: Ch 1, sc in each row-end stitch around top edge. Join with sl st. (approximately 70 sc) Rnd 2: Ch 3, dc in each sc around. Join with sl st. Rnd 3: Ch 1, sc in each dc around. Join. Fasten off. Thread white cord through the dc row of Rnd 2, entering and exiting at the center front. Attach tassels to each end of cord.
Body Setup
Pick up stitches along the lower edge of the waistband tube. With Color A and larger hook, attach yarn at side seam of waistband bottom edge. Setup Rnd: Ch 1, work sc evenly around lower edge of waistband, placing 1 sc per row-end st. You need exactly 252 sc. Place marker at beginning of round and at the halfway point (stitch 127) to mark side seams. Join with sl st. (252 sc)
Body Wave Stitch in the Round
Rnd 1 (Color A): Sl st to first sc. Ch 3 (counts as dc), work 4 more dc in same st (first shell complete), skip 2 sc, sc in next sc, skip 2 sc. Continue: (shell in next sc, skip 2, sc in next, skip 2) 41 more times. Join with sl st to top of beginning ch-3. (42 shells, 42 sc)
Rnd 2 (Color A): Ch 1, sc in joining sl st, ch 2, sc in center dc of next shell, ch 2. Continue: (sc in next sc, ch 2, sc in center dc of next shell, ch 2) around. Join with sl st to first sc. (84 sc, 84 ch-2 sps)
Rnd 3 (Color B): Sl st to first ch-2 sp. Ch 3, 4 more dc in same ch-2 sp (shell), sc in next sc, shell in next ch-2 sp, sc in next sc. Continue: (shell in ch-2 sp, sc in next sc) around. Join. (42 shells, 42 sc)
Rnd 4 (Color B): Repeat Rnd 2.
Continue working Rnds 3 and 4, changing colors every 2 rounds following the stripe sequence. Work through all 28 body rounds.
Checkpoint: Body tube should be 42 in / 107 cm in circumference and 12 in / 30 cm tall (including waistband).
Dividing for Legs
After last body round, divide the tube into two legs. The 252 stitches divide into two legs of 126 stitches each. At stitch 1 (front center), ch 10. Skip to stitch 127 (back center). Sl st into stitch 127.
First Leg Setup: Beginning at stitch 1, work across first 126 stitches, then work 10 sc across the ch-10 bridge. Join with sl st. Place marker. Work decreases as follows: sc2tog at each end of the crotch bridge, plus 2 more sc2tog evenly spaced to reach 132 sc. (132 sc)
Second Leg: Attach yarn at stitch 127. Work across remaining 126 body stitches, then 10 sc across opposite side of bridge. Apply same decreases to reach 132 sc. (132 sc)
Leg Wave Stitch
Work each leg separately using the wave shell pattern. Continue the stripe sequence from where the body left off.
Leg Rnd 1 (RS): Ch 3, 4 dc in first st (shell), skip 2, sc in next, skip 2. Continue: (shell, skip 2, sc, skip 2) 21 times. Join. (22 shells, 22 sc)
Leg Rnd 2: Ch 1, sc in join, ch 2, sc in center dc of shell, ch 2. Continue around. Join.
Continue until legs measure approximately 26 in / 66 cm below the crotch join.
Hem Finish
After final stripe round, with Color A and larger hook: Hem Rnd: Ch 1, sc in each dc and sc evenly around. Join. (132 sc) Fasten off. Repeat for second leg.
Fringe Application
Fringe runs along both outer side seams, from hip level down to the hem. Cut fringe strands 20 in / 51 cm long. Each fringe knot uses 2 strands folded in half. Work 1 fringe knot into every other row-end stitch along the outer side seam of each leg. Match fringe colors to the stripe they’re attached to. After all fringe is attached, trim ends to a uniform 9 in / 23 cm length.
Size Customization Tips
To size up the top: Add 6 stitches (1 wave repeat) to the foundation chain per size. Every 6 extra stitches adds approximately 1.7 in / 4.3 cm to width per panel.
To size up the pants waistband: Add rows to the ribbing strip to reach your waist measurement minus 2 in / 5 cm for stretch ease.
To size up the pants body: Increase the Setup Rnd by 12 stitches per size.
To lengthen pants: Add additional full stripe sequences to the leg section.
For a shorter crop top: Reduce total wave rows from 24 to 16.
Finishing and Blocking
Weave in all ends on the wrong side. Wet block both pieces by submerging in lukewarm water, gently pressing out excess (don’t wring), and laying flat on blocking mats. Pin to finished measurements, gently opening the shell stitches with your fingers. Allow to dry completely. Blocking makes a huge difference in how the wave stitch pattern looks. Don’t skip this step.
Care Instructions
Machine wash on gentle cycle in cold water if using superwash wool or acrylic. Lay flat to dry. Do not tumble dry or iron directly on the fabric. Hand wash is recommended for wool or wool-blend yarns. Store folded flat to prevent stretching.
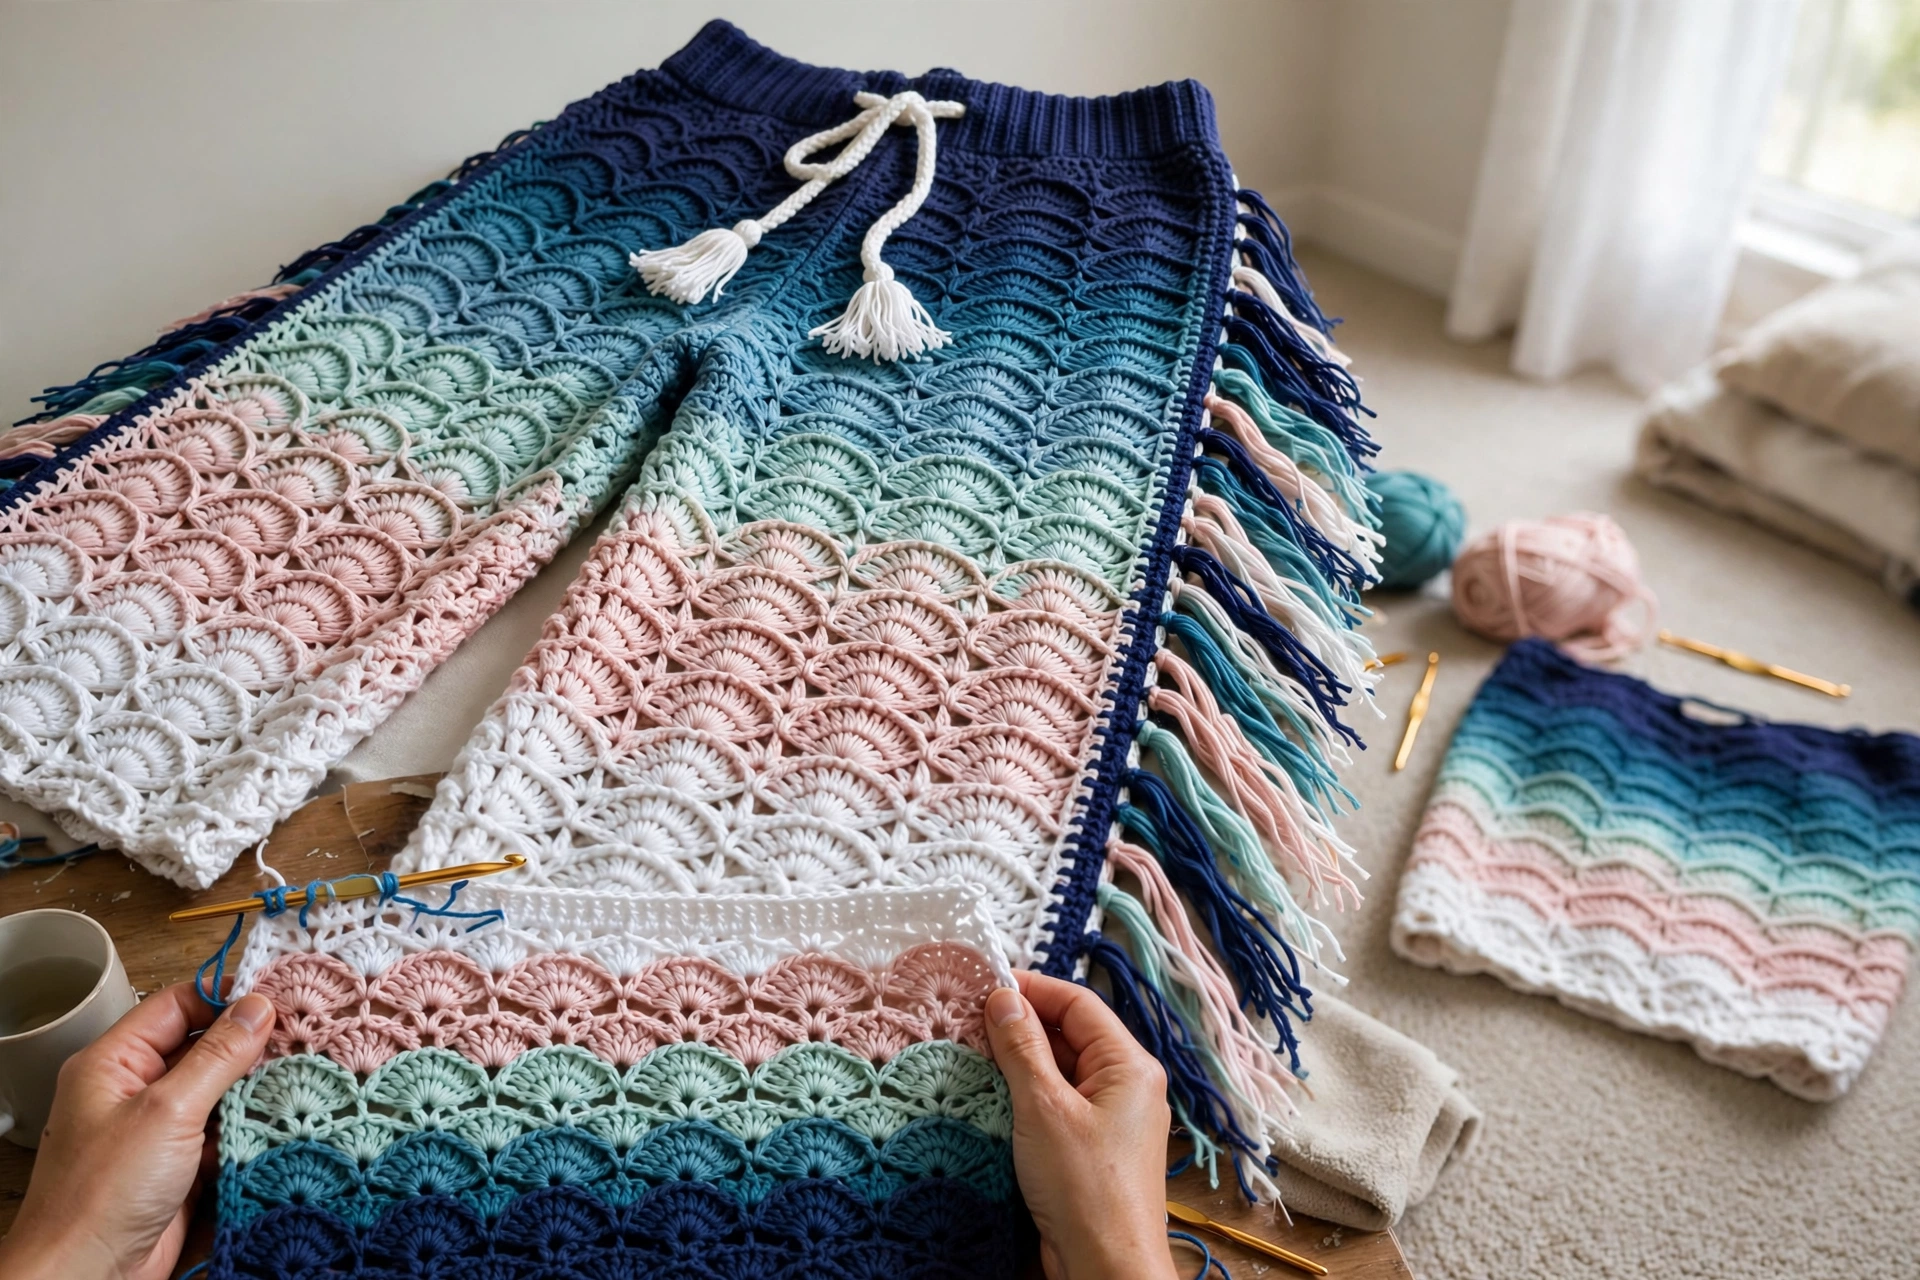
Final Thoughts on This Crochet Pattern
Oh, sweet friend, this Ocean Wave set has been one of my most requested designs ever since those first photos of my sister twirling at the festival. There is something so dreamy about the way the shell waves ripple through the gradient, from that deep midnight navy all the way down to soft, foamy white, with all that lovely fringe swaying with every step. It looks far more complicated than it truly is, I promise. Once you settle into the rhythm of the wave pattern, it becomes the most meditative, soothing crochet.
Thank you, from the bottom of my heart, for choosing this pattern for your next project. I cannot wait to see your finished sets. If you make it, I would be so delighted to see it. Share a photo on Instagram or Facebook and tag me. Seeing your beautiful makes is genuinely my favorite part of all of this.
And if you are excited to make this set but not quite ready to begin today, go ahead and pin this pattern to your Pinterest boards so it will be waiting for you. Please do leave a comment below if you make it. I read every single one, and hearing how your projects turn out simply makes my day.
You Might Also Like
- Sea Glass Breeze Summer Crochet Cover-Up Free Pattern
- Sunset Blush Crochet Halter Top Free Pattern
- Driftwood Dreams Crochet Beach Bag Free Pattern
- Coral Reef Shell Stitch Crochet Skirt Free Pattern