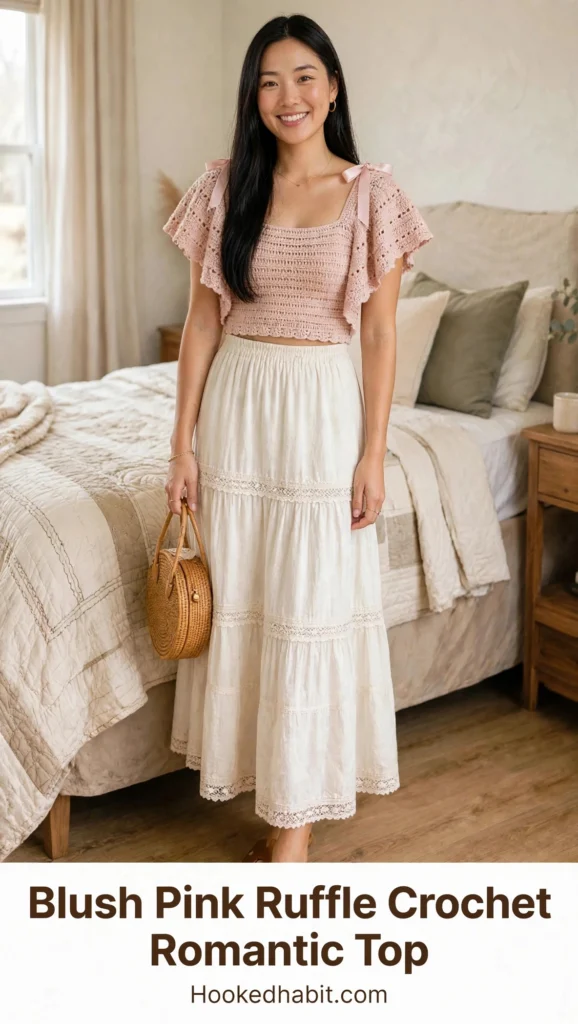
I know, I know — a ruffled crochet top sounds like one of those projects you admire from afar but never actually dare to start. Those floaty sleeve panels look so intricate, and a fitted bodice feels like something only the really advanced makers can pull off. But I am here to tell you the sweetest little secret: if you can single crochet in the round and keep track of your stitch counts, you can absolutely make this top. I promise.
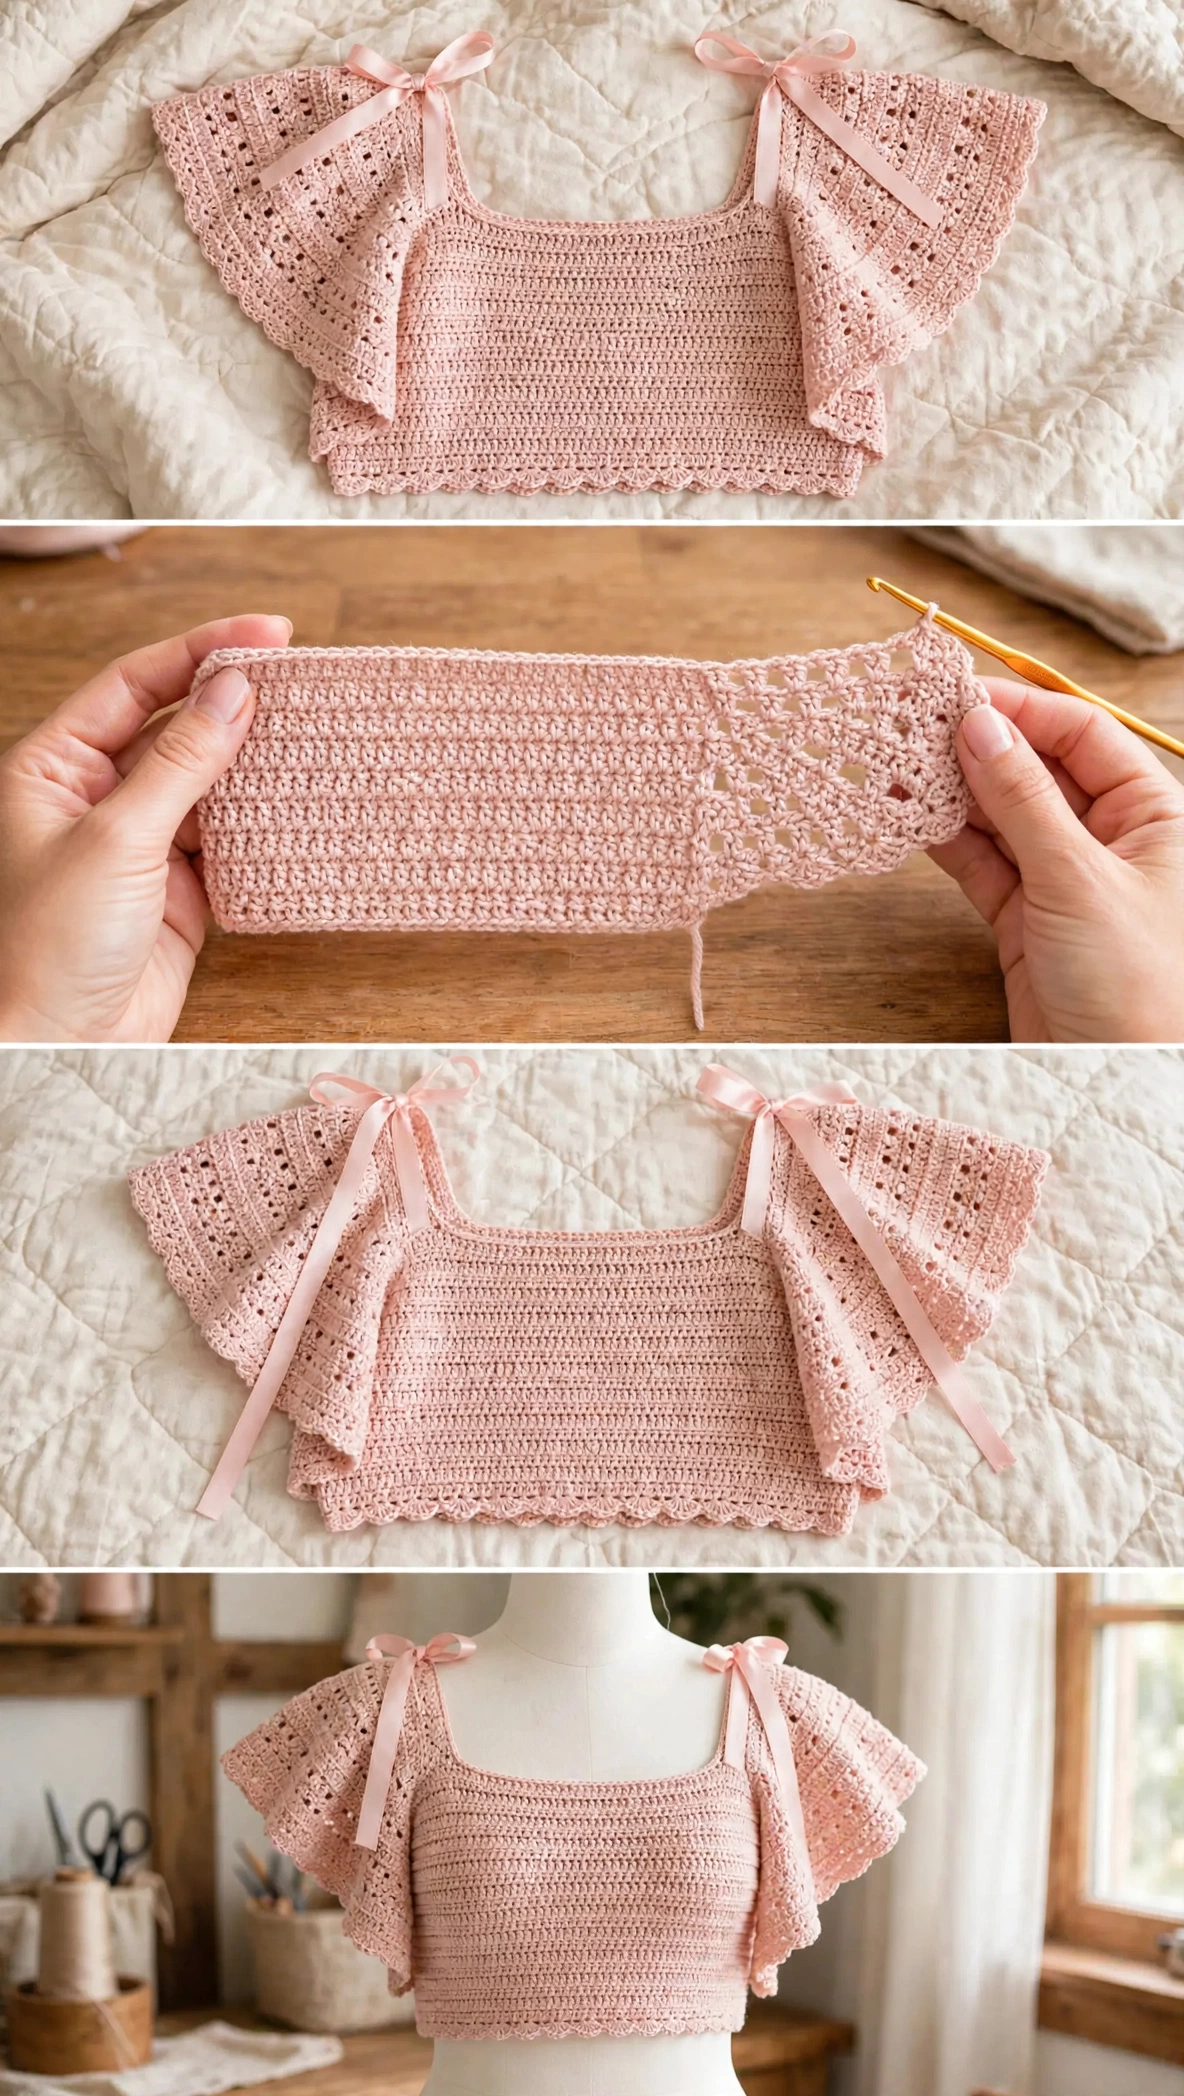
This dreamy blush pink top is broken into the most manageable little sections. The bodice is simply single crochet worked upward, round after round. The ruffles are flat panels with easy increases. And that gorgeous smocked texture? It is just working in the back loop only every few rounds. Nothing frightening at all, my friend.
Whether you have made a handful of scarves and are ready to try your very first garment, or you are a seasoned crocheter who still gets a little nervous about fitted pieces, this pattern holds your hand through every step. I have added stitch counts at the end of every single row and round, plus little measurement checkpoints so you always know you are right on track.
About This Crochet Pattern
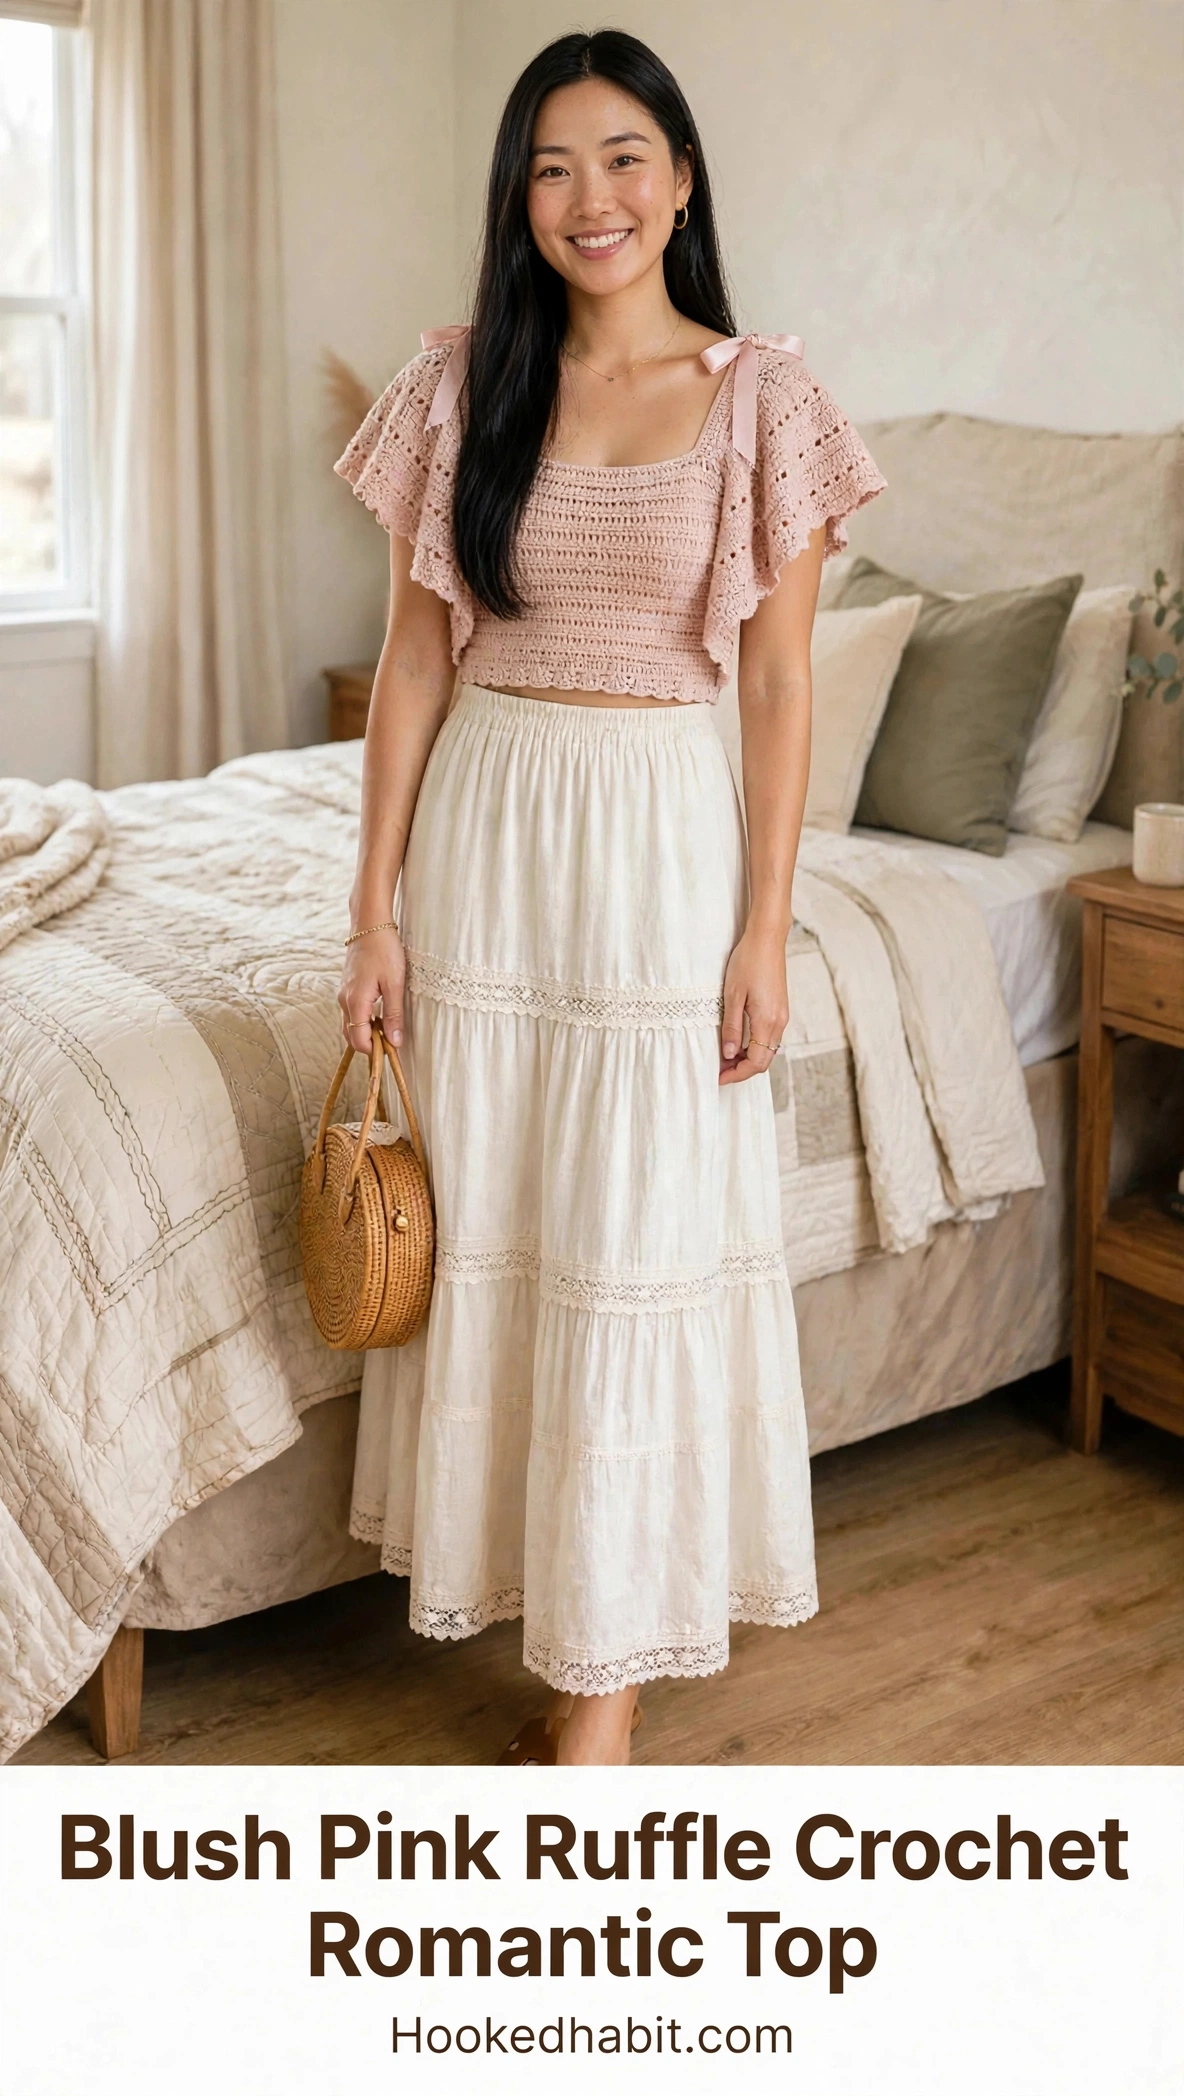
This cropped top has a beautifully fitted bodice with delicate horizontal ridges that give it the loveliest smocked look. The dramatic ruffle sleeves attach at the shoulders and fall so softly over the upper arms. Little satin ribbon ties at each shoulder add the most romantic finishing touch, and the scalloped edges along the hem and ruffle borders complete that feminine silhouette we all adore.
The construction is wonderfully straightforward once you see the big picture. You start with the scalloped hem border, then build the bodice upward in continuous rounds. The ruffle sleeves are made separately as flat panels, blocked to open up those pretty eyelets, and then sewn to the bodice. To finish, you simply thread ribbon through the shoulder loops and tie the sweetest bows.
Skill level: Intermediate. You will want to be comfortable with basic stitches, working in the round without joining, and following detailed stitch counts. If you have finished at least two garment projects before, you will find this completely doable with a little patience.
Time estimate: 18 to 26 hours total. The bodice takes approximately 10 to 14 hours. Each ruffle sleeve takes 3 to 4 hours. Blocking and ribbon finishing add 1 to 2 hours.
Finished Measurements
This pattern is written for a finished bust of 34 to 36 inches (86 to 91 cm). See the size customization section for adjustments.
-
Bust circumference: 34 to 36 in / 86 to 91 cm
-
Bodice length (hem to underarm): 7 in / 18 cm
-
Total length (hem to top of bodice): 10 in / 25.5 cm
-
Ruffle sleeve drop from shoulder: approximately 5 in / 12.5 cm
-
Ruffle sleeve width at widest point: approximately 9 in / 23 cm
Materials Needed for This Crochet Top
Yarn: Approximately 750 to 900 yards (685 to 823 m) of DK weight yarn (CYCA #3 Light) in blush pink. A smooth, slightly mercerized cotton or cotton blend gives the prettiest stitch definition for the eyelet sections and holds the ruffle shape beautifully.
Recommended yarns:
-
Paintbox Yarns Simply DK (100% cotton, 137 yd / 125 m per 50 g skein) in Blush Pink. You will need 6 to 7 skeins.
-
We Are Knitters The Petite Wool (100% merino wool, 153 yd / 140 m per 50 g skein) in Pale Pink. You will need 5 to 6 skeins.
-
Lion Brand 24/7 Cotton DK (100% mercerized cotton, 186 yd / 170 m per 100 g skein) in Blush. You will need 4 to 5 skeins.
Substitution note: Choose any DK weight yarn (approximately 200 to 220 yd per 100 g) with a smooth surface and minimal halo. Avoid bouclé or heavily textured yarns because the eyelet lace pattern needs clear stitch visibility to really shine.
Hooks:
-
US size G-6 / 4.0 mm for the bodice
-
US size H-8 / 5.0 mm for the ruffles (the larger hook creates the looser, drapey ruffle fabric)
Notions:
- Tapestry needle for weaving ends
- Stitch markers (at least 6)
- 2 yards (1.8 m) of 3/4 inch (2 cm) wide satin ribbon in blush pink, cut into two equal lengths of 1 yard (0.9 m) each
- Scissors
- Blocking mat and pins or blocking wires
- Spray bottle for wet blocking
Gauge
With G-6 / 4.0 mm hook and DK weight yarn in single crochet:
18 stitches and 20 rows = 4 inches / 10 cm (in the round)
With H-8 / 5.0 mm hook in the ruffle eyelet pattern:
16 stitches and 8 rows = 4 inches / 10 cm (blocked)
Please do not skip your gauge swatch on this one, loves. Even half a stitch per inch of difference will change the fit noticeably across the full circumference. Make a swatch of at least 5 by 5 inches before you begin and adjust your hook size as needed.
Abbreviations and Stitch Definitions
- beg: beginning
- BLO: back loop only, inserting your hook through only the back loop of the stitch instead of both loops
- ch: chain, wrapping yarn over hook and pulling through the loop on your hook
- ch-sp: chain space, the gap created by a chain in the previous row
- dc: double crochet, yarn over, insert hook, pull up loop, yarn over and pull through 2 loops twice
- hdc: half double crochet
- inc: increase, working 2 stitches into the same stitch
- rem: remaining
- rep: repeat
- rnd: round
- RS: right side
- sc: single crochet, insert hook, pull up loop, yarn over and pull through both loops
- sk: skip
- sl st: slip stitch, insert hook, yarn over and pull through both the stitch and loop on hook
- sp: space
- st(s): stitch(es)
- t-ch: turning chain
- WS: wrong side
- yo: yarn over
Special Stitches for This Romantic Crochet Top
Shell Stitch: Work 5 dc into the same stitch or space. This creates a fan or shell shape and forms the scalloped edge at the hem and at the lower edge of each ruffle.
V-Stitch: Work (1 dc, ch 1, 1 dc) into the same stitch or space. This creates an open V shape and forms the eyelet grid of the ruffle panels.
Foundation Single Crochet (fsc): This optional method produces a stretchy, even starting edge. Begin with a slip knot, ch 2. Insert hook into the second chain from hook, yo and pull up a loop (2 loops on hook), yo and pull through 1 loop (this forms the base chain), yo and pull through both loops. For each subsequent fsc, insert hook into the single loop at the bottom of the previous fsc and repeat.
Picot: Ch 3, sl st into the first chain made. This creates a small decorative loop.
Eyelet Row: Ch 3 (counts as first dc), turn. (Sk 1 st, dc in next st, ch 1) across to last st, dc in last st. Each repeat produces one eyelet hole.
Pattern Notes Before You Begin
The bodice is worked in continuous rounds from the bottom hem upward. Do not join rounds unless instructed. Use a stitch marker to track the beginning of each round, moving it up as you go.
The ruffle sleeves are worked as flat panels separately and then attached along the upper side edges of the bodice at the armhole.
The ch-3 at the beginning of a dc row counts as 1 dc throughout this pattern unless otherwise noted.
Block each ruffle panel before attaching it to the bodice. This opens the eyelets and helps the ruffle lie flat and drape correctly.
Step by Step Instructions
Section 1: Scalloped Hem Foundation Border
The hem border is worked first as a flat row and then joined into a round. It establishes the lower finished edge of the bodice.
With G-6 / 4.0 mm hook, chain 162. Without twisting the chain, join with sl st to the first chain to form a ring.
Rnd 1 (Scalloped Border Setup): Ch 1, sc in first ch, (sk 2 ch, 5 dc in next ch, sk 2 ch, sc in next ch) across, joining last sc to first sc with sl st. [27 shells and 27 sc = 162 sts total]
Rnd 2 (Picot Border): Sl st to center dc of first shell (3rd dc), ch 1, sc in same st, ch 3, sl st in first ch of ch-3 (picot made), (sc in center dc of next shell, picot) around, sl st to first sc to join. [27 sc with picots]
The scalloped border is complete. Do not cut yarn. Continue upward into the bodice.
Checkpoint 1: After the border, you should have a joined ring of 27 scallop groups sitting at the lower edge. The ring should be approximately 36 inches / 91 cm in circumference.
Section 2: Bodice Body
You will now work upward from the hem border into the main bodice fabric using single crochet (sc) in continuous rounds.
Rnd 3 (Bodice Setup Round): Working into the back of the original chain (the bottom side of the foundation chain, below the scallop border you just worked), join yarn with sc to any foundation chain st. Sc evenly across all available back-of-chain sts, placing 1 sc in each of the 162 original chain spaces along the back loop row, sl st to first sc to close. [162 sc]
Do not join subsequent rounds. Place stitch marker at first st of each round and move it up.
Rnds 4 through 8 (5 rounds of sc): Sc in each st around. [162 sc each round]
Rnd 9 (BLO Texture Round): Sc in BLO of each st around. [162 sc]
This BLO round creates a subtle horizontal ridge that echoes the smocked texture visible on the bodice.
Rnds 10 through 14 (5 rounds of sc): Sc in each st around. [162 sc each round]
Rnd 15 (BLO Texture Round): Sc in BLO of each st around. [162 sc]
Rnds 16 through 20 (5 rounds of sc): Sc in each st around. [162 sc each round]
Rnd 21 (BLO Texture Round): Sc in BLO of each st around. [162 sc]
Rnds 22 through 26 (5 rounds of sc): Sc in each st around. [162 sc each round]
Checkpoint 2: After Round 26 the bodice body should measure approximately 7 inches / 18 cm from the top of the scalloped hem border to the current working round. If your measurement differs, add or remove sc rounds in groups of two (between BLO rounds) to adjust length before proceeding.
Section 3: Upper Bodice Band and Shoulder Strap Openings
The upper bodice creates a wider, flatter band that holds the top edge in place, and includes four shoulder strap opening points.
Rnd 27 (Upper Band Rnd 1): Sc in each st around. [162 sc]
Rnd 28 (Upper Band Rnd 2): Sc in each st around. [162 sc]
Rnd 29 (Upper Band Rnd 3): Sc in each st around. [162 sc]
Rnd 30 (Shoulder Strap Opening Round): You will create four ch-sp loops, one at each shoulder corner (two at front, two at back). These loops become the anchor points through which the satin ribbon ties are threaded.
Mark four points around the current round as follows:
-
Point A: St 1 (left front shoulder corner)
-
Point B: St 41 (right front shoulder corner)
-
Point C: St 82 (left back shoulder corner)
-
Point D: St 122 (right back shoulder corner)
Work as follows: Sc to st 1, (ch 5, sk 5 sts, sc in next st, sc in each st to next marked point) x 4, sl st to first sc. [4 ch-5 loops at shoulder corners; 142 sc between loops]
Rnd 31 (Close Strap Loops): Sc in each sc around and work 5 sc into each ch-5 sp (treating each ch-sp as a 5-st segment). [162 sc]
Rnd 32 (Top Edge Finish): Sl st in BLO of each st around. Join with sl st. Fasten off and weave in end. [162 sl sts]
This slip stitch round creates a firm, neat top edge that does not curl.
Checkpoint 3: The full bodice should now measure approximately 10 inches / 25.5 cm from the very bottom scallop edge to the top slip stitch edge.
Section 4: Ruffle Sleeves (Make Two, Identical)
Each ruffle sleeve is a flat panel worked in rows, beginning from the top shoulder edge and increasing outward to create the ruffle flare. Switch to H-8 / 5.0 mm hook for all ruffle sections.
Foundation: Ch 29.
Row 1 (WS): Sc in 2nd ch from hook and in each ch across. Turn. [28 sc]
Row 2 (RS, Eyelet Setup): Ch 3 (counts as dc), (ch 1, sk 1 st, dc in next st) across to last st, dc in last st. Turn. [15 dc + 14 ch-1 sp = 28-st width maintained]
Row 3 (WS, Increase Row): Ch 1, sc in first st, 2 sc in next ch-1 sp, (sc in next dc, 2 sc in next ch-1 sp) across, sc in last dc. Turn. [44 sc]
Row 4 (RS, V-Stitch Eyelet Row): Ch 3 (counts as dc), (ch 1, sk 1 st, dc in next st) across to last st, dc in last st. Turn. [44 sts width maintained]
Row 5 (WS, Second Increase Row): Ch 1, sc in first dc, 2 sc in each ch-1 sp, sc in each dc across, sc in top of t-ch. Turn. [65 sc]
Row 6 (RS, Eyelet Row): Ch 3, (ch 1, sk 1, dc in next) across. Adjust so you end on a dc in last st. Turn. [65 sts]
Row 7 (WS, Third Increase Row): Ch 1, sc in first dc, (sc in next ch-1 sp, sc in next dc) across, sc in top of t-ch. Turn. [66 sc]
Row 8 (RS, Final Increase Row): Ch 1, sc in first sc, 2 sc in next sc, (sc in next sc, 2 sc in next sc) across. Turn. [99 sc]
Row 9 (WS, Final Eyelet Row): Ch 3, (ch 1, sk 1, dc in next) across. End dc in last sc. Turn. [99 sts]
Row 10 (RS, Scalloped Ruffle Hem): Ch 1, sc in first dc, 5 dc shell in next dc, sk ch-sp on both sides of shell dc, continue across placing sc in every other dc (25 sc) and shell in alternating dc (24 shells of 5 dc = 120 dc). Total visible sts = 25 sc + 120 dc = 145 sts in the ruffle hem row.
Row 11 (Picot Edge on Ruffle Hem): Sl st to center dc of first shell, ch 1, sc in same st, (ch 3, sl st in base of ch-3 for picot, sc in center dc of next shell) across, end with picot, fasten off leaving a 12-inch / 30 cm tail for seaming. [25 sc with 25 picots]
Checkpoint 4: Each finished ruffle panel before attachment should measure approximately 5 inches / 12.5 cm tall and approximately 9 inches / 23 cm wide at the ruffle hem edge after blocking.
Section 5: Sleeve Attachment
Lay the bodice flat. Identify the front and back shoulder strap opening loops from Rnd 30. Each sleeve panel attaches from one shoulder loop on the front to the corresponding shoulder loop on the back, draping over the upper arm area.
Using tapestry needle and the long yarn tail left at the end of Row 11, sew the Row 1 (shoulder attachment edge) of each ruffle panel to the upper edge of the bodice. The 28 sts of Row 1 align across the top of the bodice spanning from just inside the front shoulder loop to just inside the back shoulder loop, approximately 6 inches / 15 cm of bodice edge per side.
Use a whip stitch or mattress stitch to seam. Work from front loop to back loop to keep the attachment line clean.
Section 6: Ribbon Tie Finishing
Cut satin ribbon into two 36-inch / 90 cm lengths.
For each shoulder, thread one ribbon length through the ch-5 loop on the front shoulder from the inside of the bodice to the outside. Then bring it over the top of the ruffle sleeve panel and thread it through the corresponding ch-5 loop on the back shoulder from outside to inside.
Pull both ends even so the ribbon is centered. Tie into a bow at the shoulder. The bow should sit at the top of the shoulder with both tails flowing down.
Size Customization Tips
The base stitch count for this pattern (162 sts in the round) is divisible by 6 for the scallop repeat and works for a 34 to 36-inch bust.
Each 6-stitch increment equals approximately 1.3 inches / 3.3 cm of circumference change at gauge. Add or subtract in multiples of 6 sts to maintain the scallop repeat.
-
For a 30 to 32-inch bust: Use 138 sts (23 scallop repeats). Begin with ch 138.
-
For a 38 to 40-inch bust: Use 186 sts (31 scallop repeats). Begin with ch 186.
-
For a 42 to 44-inch bust: Use 210 sts (35 scallop repeats). Begin with ch 210.
Adjust shoulder strap loop placement proportionally by dividing total stitch count by 4 to find the stitch intervals between the four shoulder corner points.
Blocking and Finishing
Wet Blocking Method (recommended for cotton): Submerge the finished top in cool water for 15 minutes until fully saturated. Gently press out excess water without wringing. Lay flat on blocking mat. Pin bodice to finished measurements. Open each eyelet in the ruffle panels by pinning the ruffle to shape, keeping the scalloped hem edge flat and even. Allow to dry completely (24 hours) before removing pins.
Steam Blocking Alternative (for wool blends): Hold steam iron 1 to 2 inches above the surface. Apply steam to the ruffle panels and bodice without pressing down. Pat gently into shape and allow to cool completely before moving.
Care Instructions
Hand wash in cool water with a gentle detergent. Do not wring. Press flat between two towels to remove excess moisture. Reshape to measurements and lay flat to dry away from direct sunlight or heat. Do not tumble dry. Do not iron directly over the ribbon ties. Store folded, not hung, to prevent the bodice from stretching over time.
You Did It!
I truly hope you loved making this romantic crochet top as much as I loved designing it for you. There is something so special about the combination of that fitted bodice, the dreamy ruffle sleeves, and those sweet little ribbon ties — it looks far more complicated than it really is, and that is our little secret. Thank you so much for trusting this pattern and giving it a try, it means the world to me.
If you make this blush pink ruffle top, I would absolutely love to see how yours turns out! Tag me on Instagram or share a photo in our Facebook group. Seeing your finished pieces is honestly the very best part of sharing patterns.
Go ahead and save this pattern to your Pinterest boards so you can find it when you are ready to cast on. And if you have any questions, or just want to tell me how yours turned out, leave a comment below. I read every single one and I love hearing from you!
You Might Also Like
- Berry Blossom Lace Cardigan Free Crochet Pattern
- Dusty Rose Mesh Crochet Sneaker Boots Free Pattern
- Blush Pink Shell Stitch Halter Dress Free Crochet Pattern
- Sage Green Froggy Toilet Paper Cozy Free Crochet Pattern
Pattern by Emily Hart for Hooked Habit (hookedhabit.com)